Migrate from CloudFlare and GitHub Pages to AWS for Static Web Hosting
For a number of years now I’ve ran a static website for myself using CloudFlare (DNS, CDN, DDoS, caching, etc, Domain Registrar) with the storage layer being served by GitHub pages for free Web Hosting. It works well enough, and it’s 100% free (caveats impending below). But it was time for a change, and I needed to eat my own dog food (being an AWS Solutions Architect!) and migrate the stack across to AWS.
This blog will explain how to use I migrated from CloudFlare and GitHub Pages to use Hugo as a static, SSL enabled website, running in AWS S3 and CloudFront.
It is not intended to cover any CI/CD process used, nor is it a guide of how to use Hugo. This is more focussed on the core infrastrucutre migration efforts.
Cloudflare has a decent API you can consume for CLI access to most operations, but there is now a button so I used it!
Part 1: Migrate Domain, and DNS from CloudFlare to Route53:
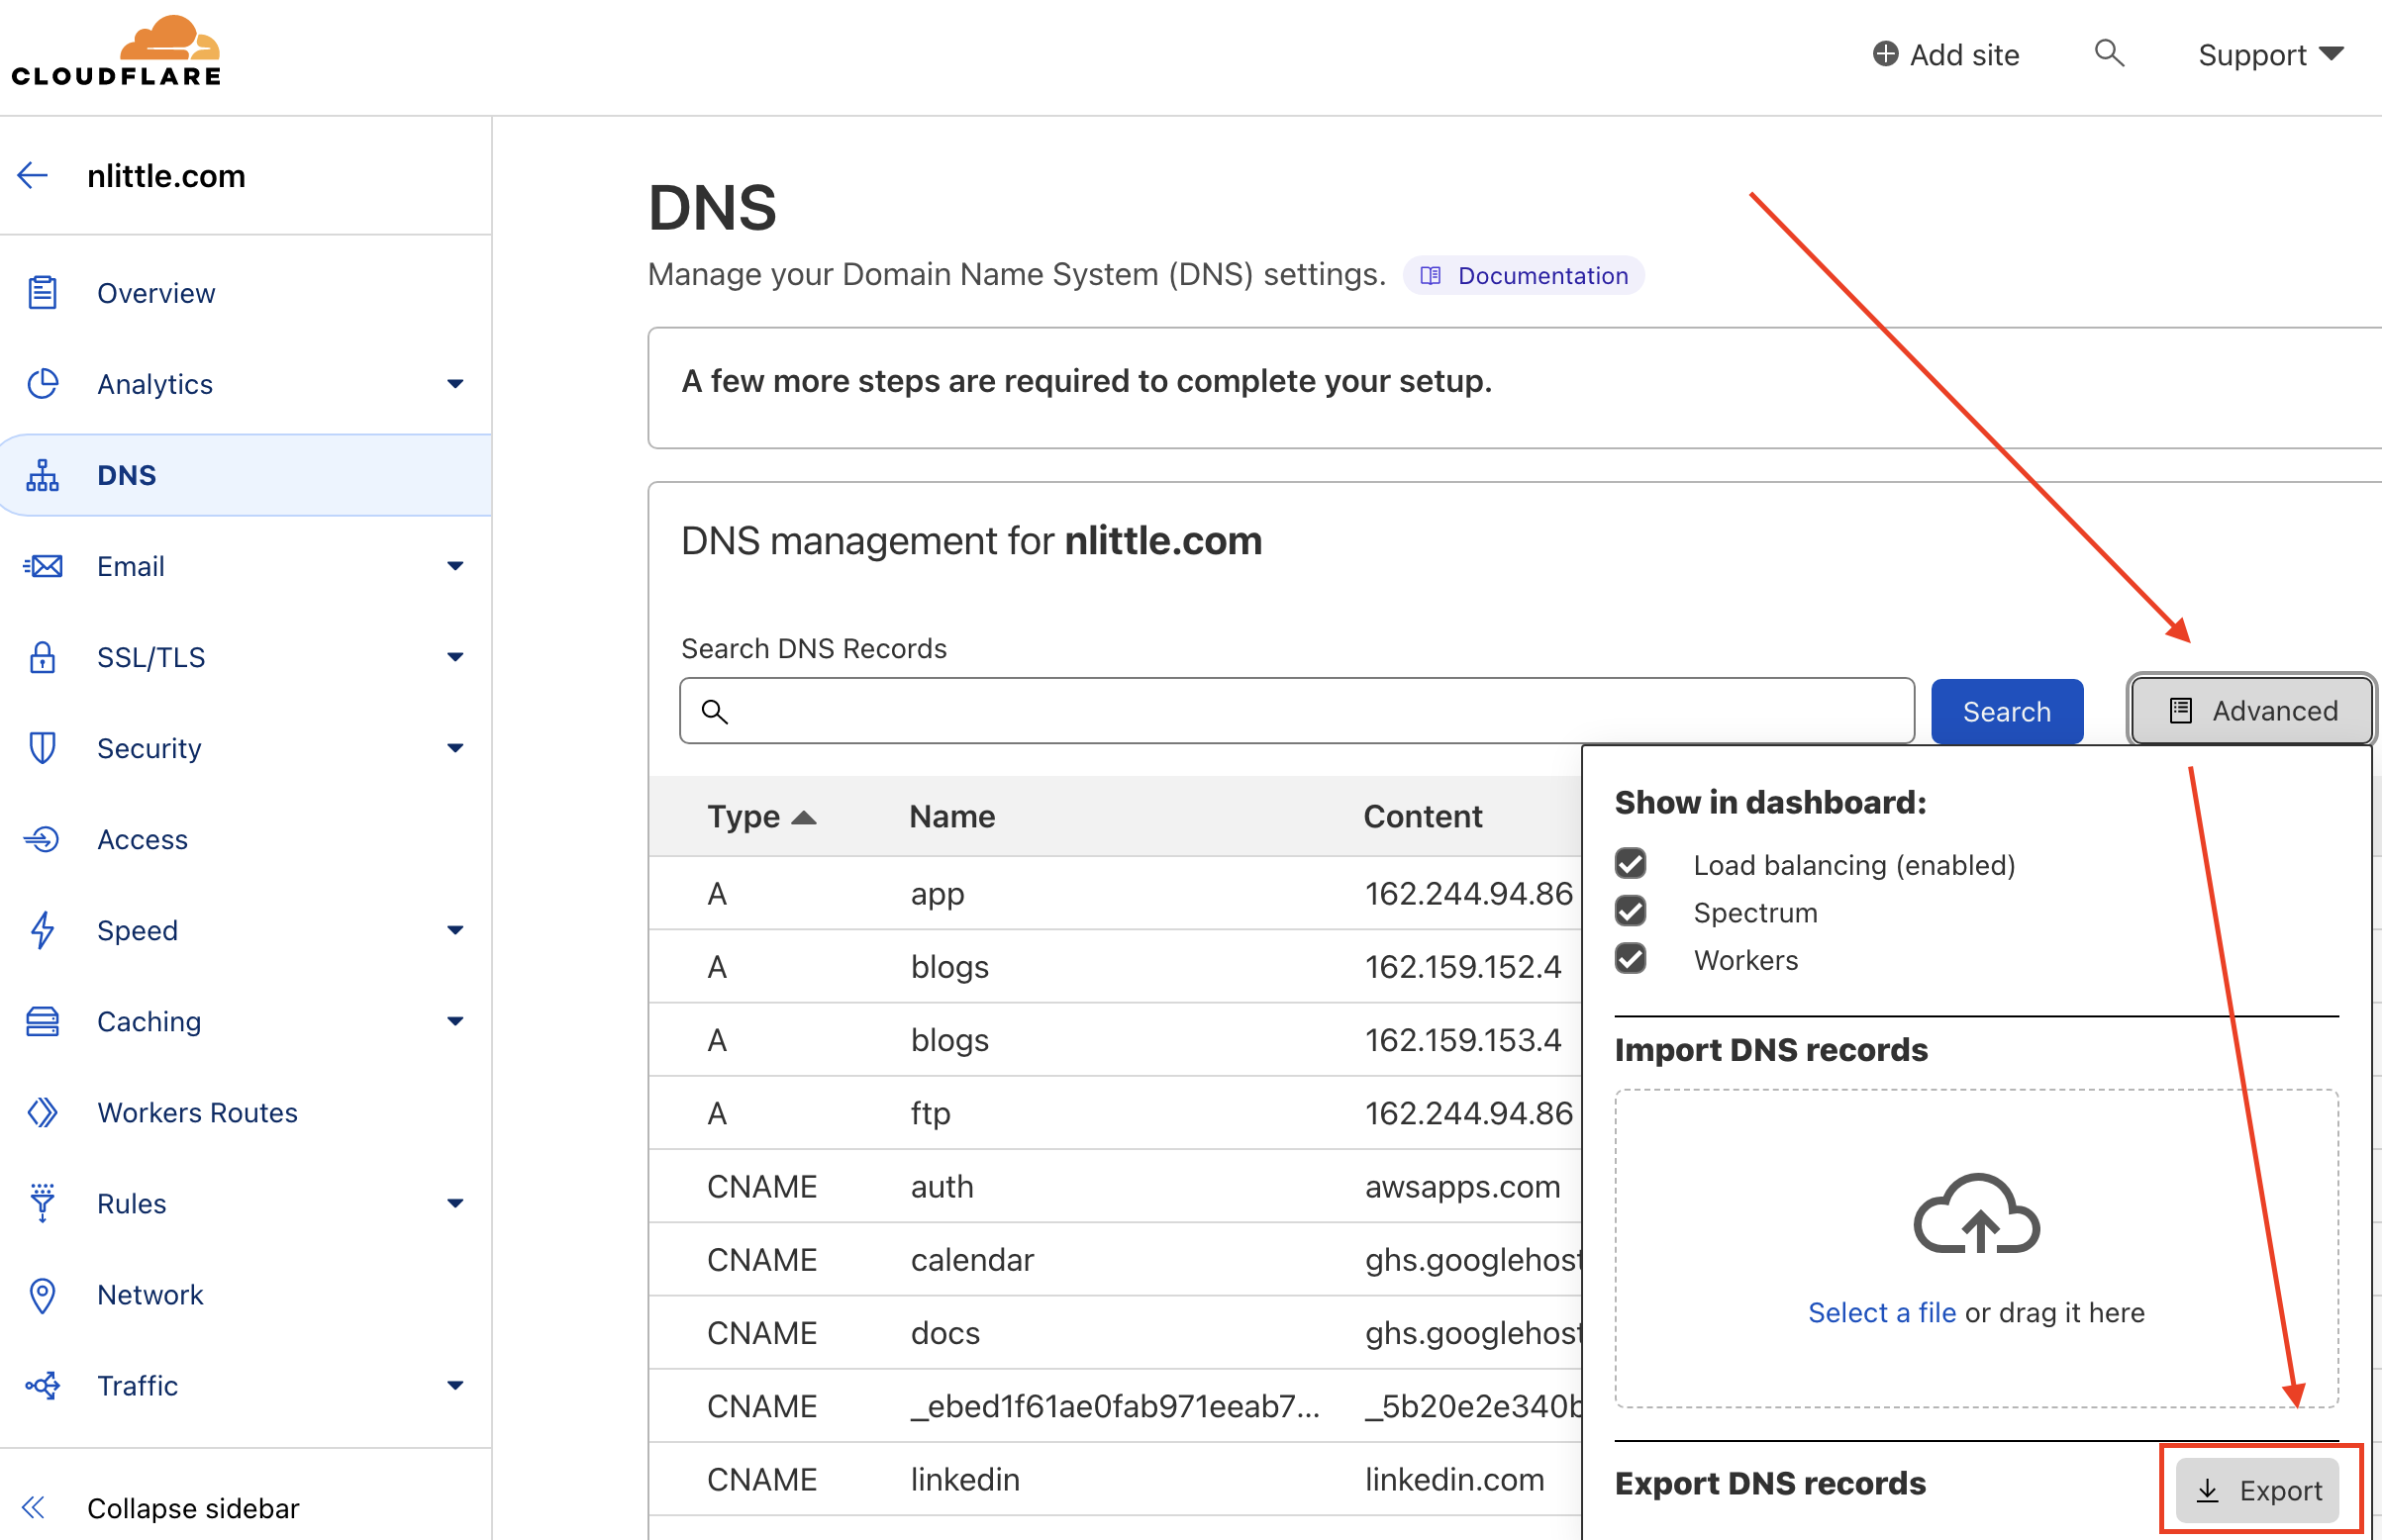
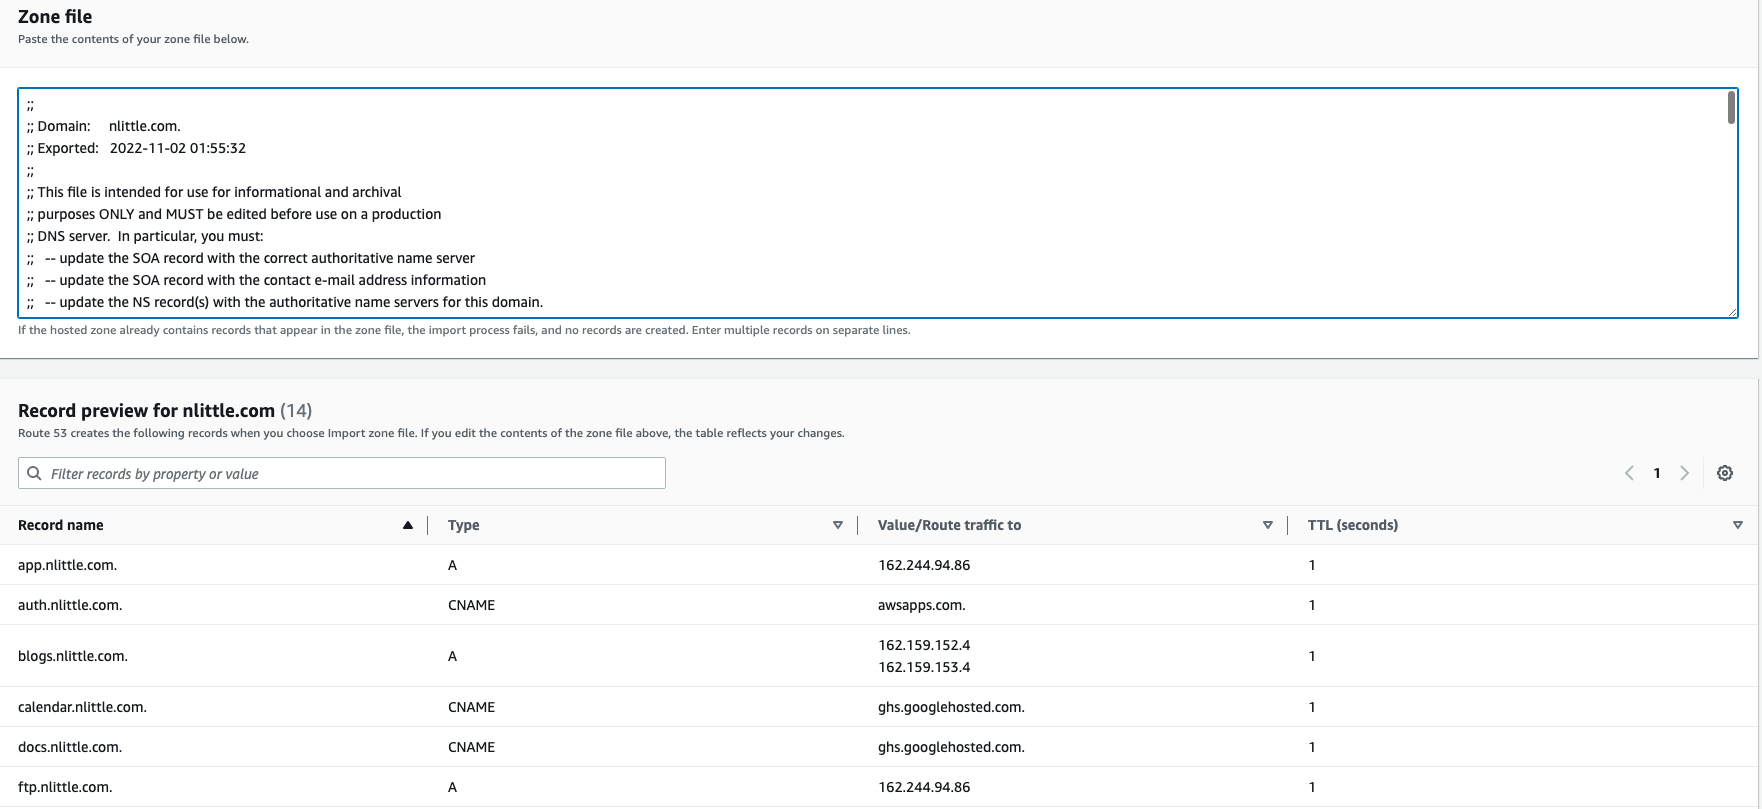
Login to the CloudFlare Management Console, Browse to your Website > DNS, and then Click the Export button to export a BIND compliant DNS zone file from CloudFlare. Copy it to your clipboard and/or keep it saved somewhere (you’ll need this later):
“Here’s one I prepared earlier” - I conveniently already have an AWS Control Tower deployed in a personal AWS AWS IAM Identity Center of mine. Let’s use it! Some handy tips that speed this process up and make the experience a breeze to use:
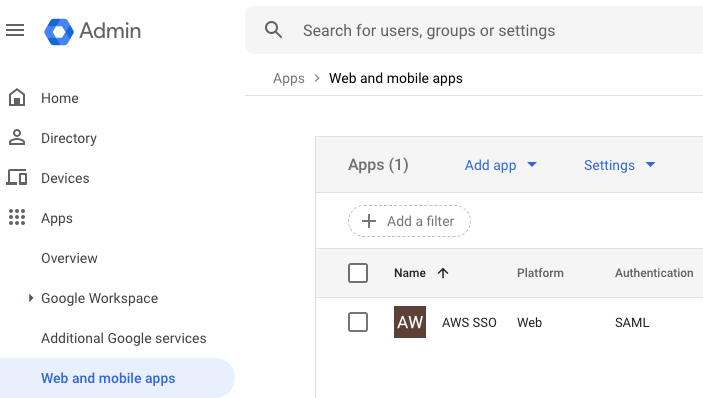
- My personal site is using a custom domain for Google Workspaces. So I setup a custom Google Workspaces SAML 2.0 application for IDP federation into AWS IAM Identity Center (as it’s deployed as part of the AWS Control Tower). The group permissions and mappings are setup for an ‘Admin’ group as defined in my Google Workspace Organization in which I’m a member of:
Google Workspaces Custom SAML Application:
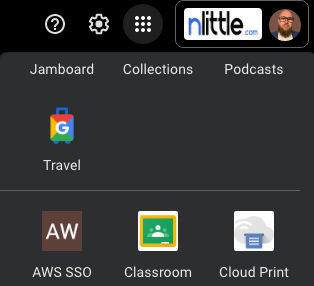
Google Workspaces SSO Access:
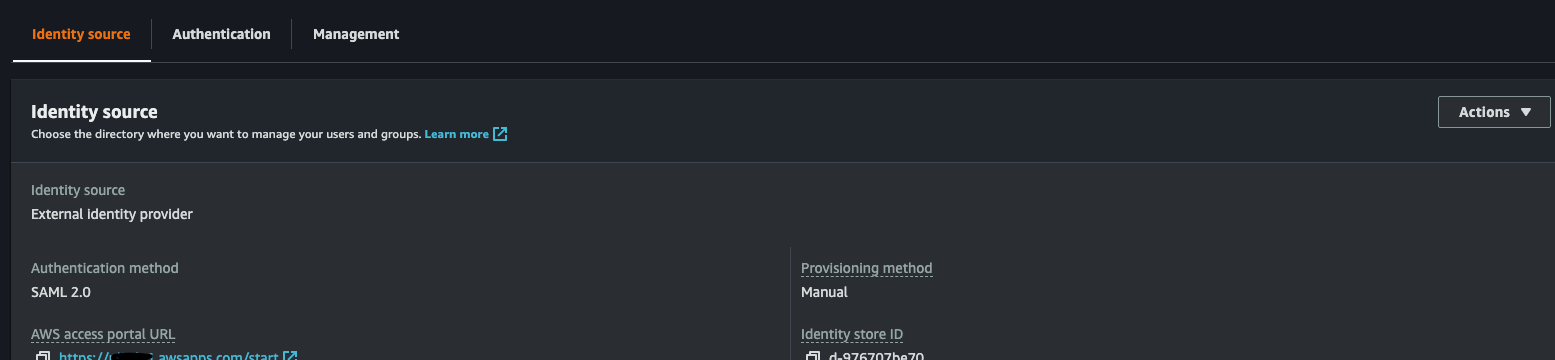
AWS IAM Identity Centre - Google Workspaces SAML IDP:
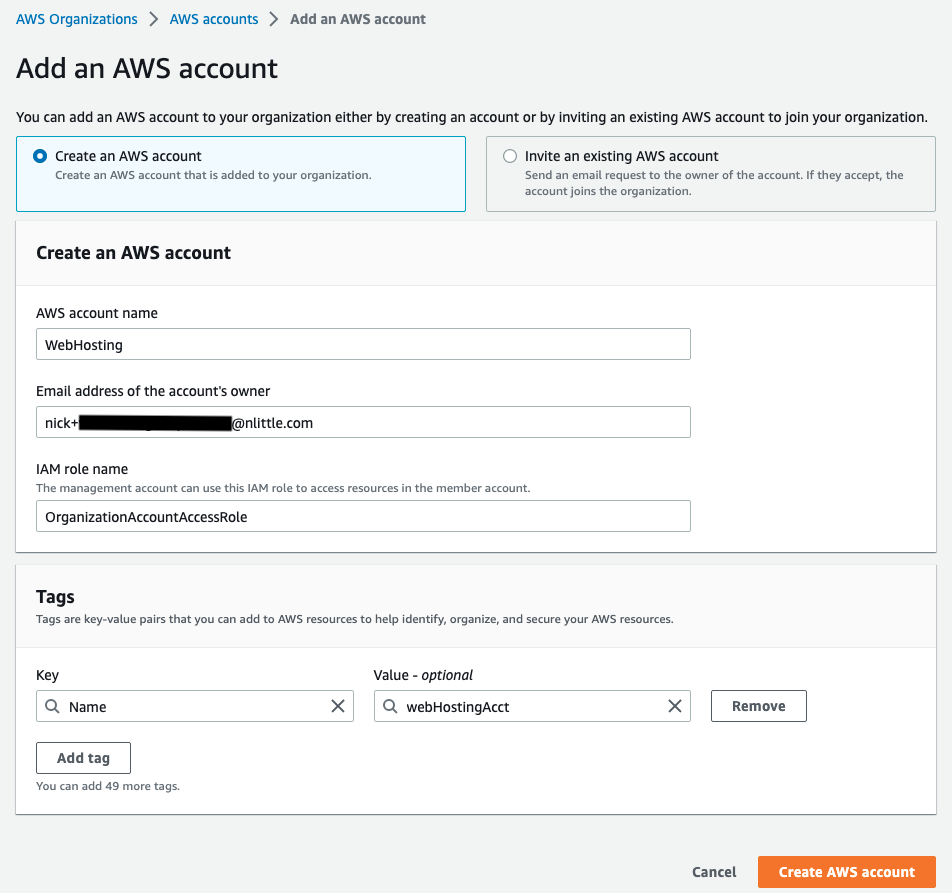
- Head on over to AWS Organizations in the AWS Management Console, and create yourself a new AWS account to use. Each AWS account is a logical container to hold resources and identities, and to ensure you follow SOLID and the principal of least privilege practises (I’m looking at you AWS Well Architected Framework), it’s best to keep operations isolated from other workloads. I called mine “Web Hosting”:
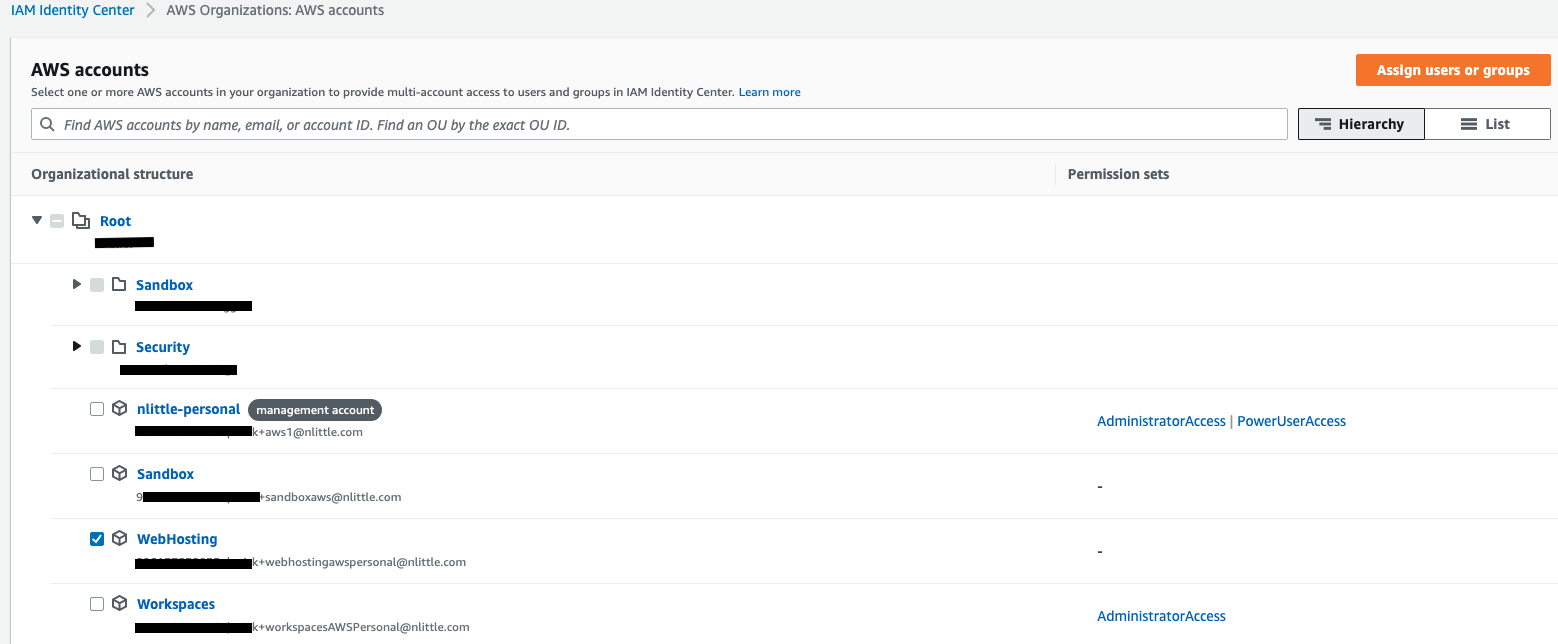
- Since I’m using AWS IAM Identity Center with Google Workspaces as the IDP, there’s no manual mucking about with any IAM roles, or assumptions. I’ve got a Permission Set already in use that is pretty locked down. So all we need to is assign the “Web Hosting” AWS account to my SAML group in AWS IAM Identity Center. This makes the “Web Hosting” account available in my list of AWS Account in the AWS IAM Identity Center console when logging in. Assign a suitable permission set to that group which gives you the required access (I’ve used Administrator Access for now).
Here is what the AWS Organization looks like:
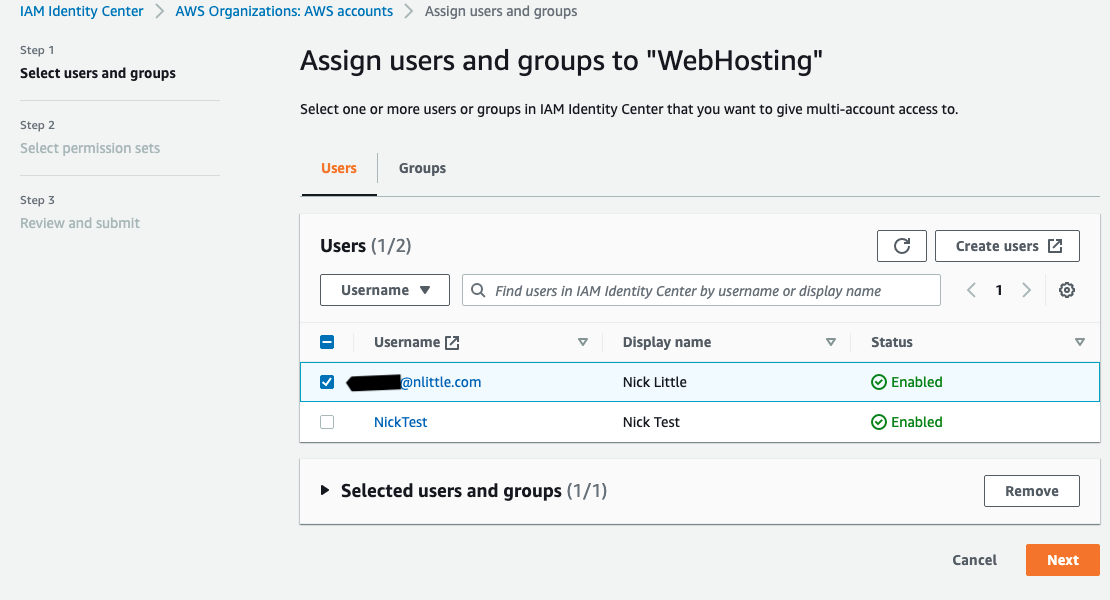
Assign the users/groups to the new “Web Hosting” AWS Account (you must already be an AWS IAM Identity Center User first if you’re not arleady):
Assign permission set to the “Web Hosting” AWS Account

-
Hit refresh on your AWS IAM Identity Center console window and voila, your shiny new “Web Hosting” AWS account is available. Jump on into it:

-
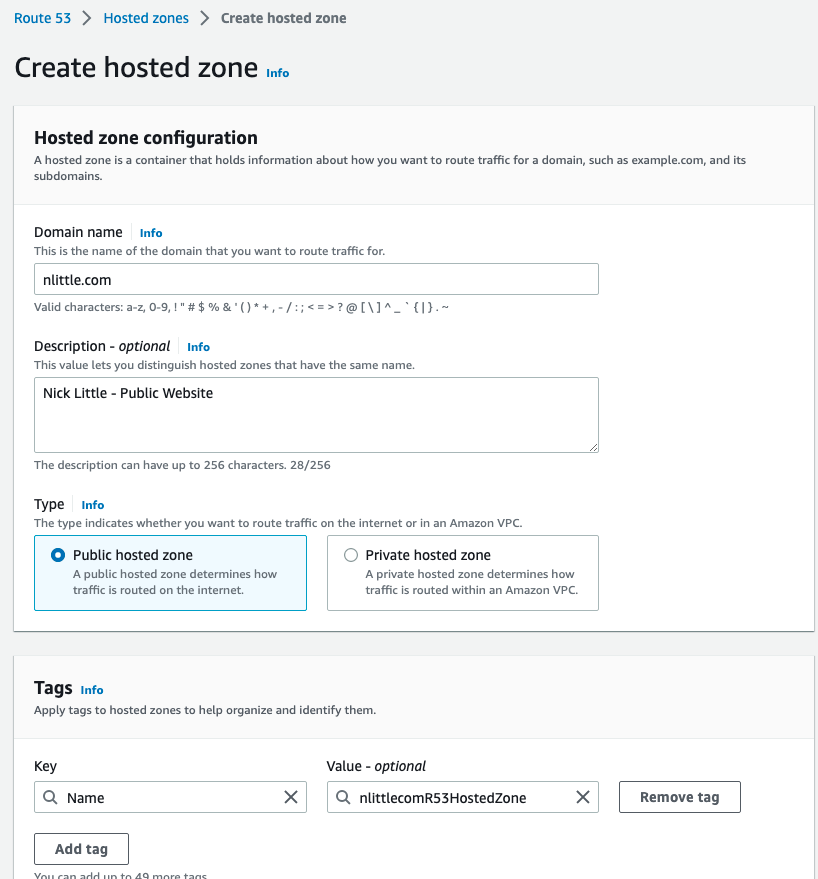
Create a new Public Hosted Zone in Route53 to serve the DNS records for your domain:
-
Copy the contents of your DNS Zone BIND file from step 1 (above). Remove or comment out the SOA record, since the domain is in use and we can’t duplicate this. Remove any NS entries if you have them. Cloudflare handles NS entries under the hood (for DNS of the TLD) so unless you’ve got any custom NS entries, it should be ok.
-
Import the zone. Fail. “RRSet of type CNAME with DNS name nlittle.com. is not permitted at apex in zone per RFC1912 section 2.4: A CNAME record is not allowed to coexist with any other data. So let’s nuke that nlittle.com CNAME in the APEX, and away it goes. This is due to the nuances between CloudFlare and Route53. CloudFlare use CNAME flattening to allow this to work (resolves each time to an A record). Route53 use aliases to achieve this (access between AWS resources only, and is free to resolve vs CNAME/A records etc).
-
Lower the TTL to 60 for the NS entries on Route 53 (find the NS entry and edit > TTL > 60)
-
Refer to the intro, CloudFlare is 100% free. You cannot use 3rd party DNS with a domain using CloudFlare as the registrar. On to step 10.
-
Now all the DNS Zone is setup in Route53, transfer out the TLD from CloudFlare to Route53. Go into the management settings in CloudFlare for the domain,remove DNSSEC, any locks, ensure all the contact info is correct (for ICANN purposes). And get a copy of the EPP code from CloudFlare, then request the transfer. It takes 5 days. But there is a hidden button on the management console of Cloudflare to accept the transfer immediately. This part is a bit tedious, but if you click around in the CloudFlare management console you’ll figure it out easily enough.
-
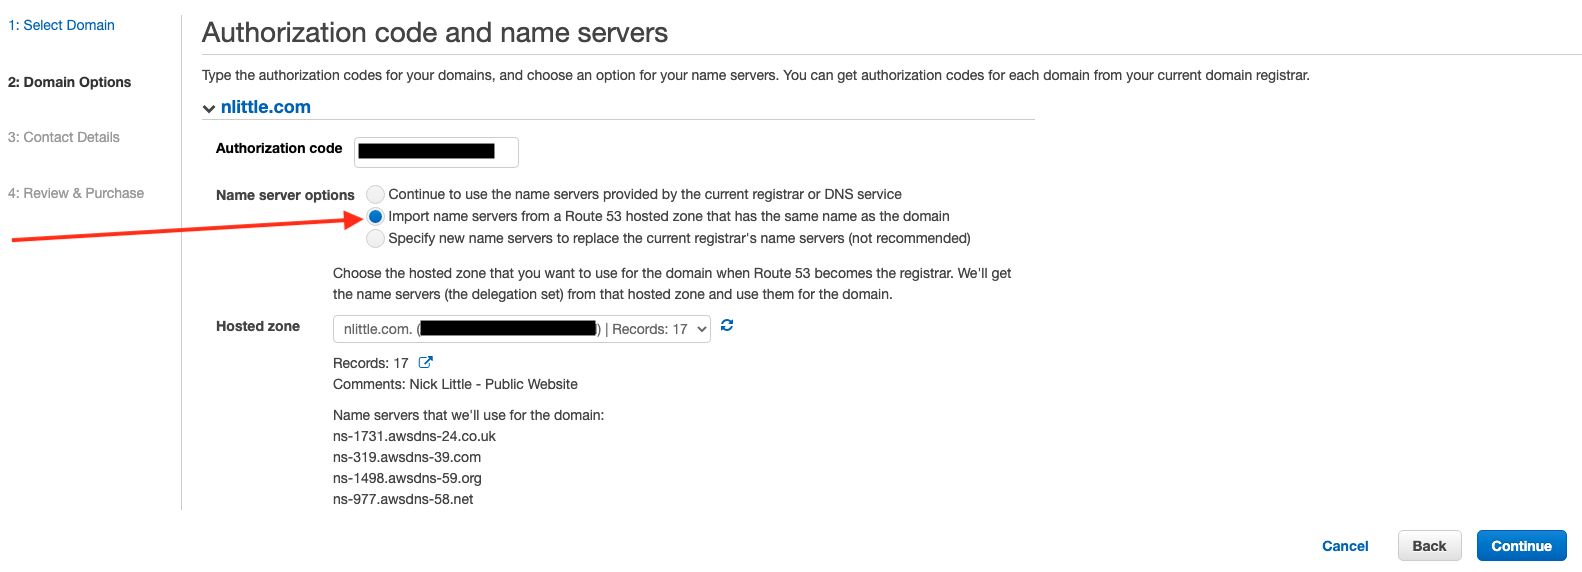
Go back into Route53 > Transfer Domain > Enter EPP > Select use existing hosted zone’s DNS entries > OK. Accept the email from AWS to validate the transfer. Wait your sweet time, for the transfer to happen and keep your finger on dig on your terminal to see how the DNS propagating is going.
I observed some weird behaviour after transferring my domain to Route53. It had defaulted to use DNSSEC and had a key added, but was un-used (and had not had an DS entries added in the public hosted zone). Once I deleted that key, it worked as expected finally. The joy of changing 12 things and once, and you’re not sure which one thing fixed it!
Once it is all looking happy, you can bump the TTL of the R53 NS entries back up if you wish, and kill off the CloudFlare account:
- For GitHub pages, there isn’t too much to do. As the source is a git repo, you could make it private, delete it. Whichever you choose. I ended up just deleting the repository.
Part 2: Static Web Hosting on AWS
There are a few ways to cut this, to keep it simple:
- Go to North Virginia region to request an ACM TLS cert(s) for your domain (www and or TLD only, I don’t like wildcard TLS certs for obvious reasons)
- Create the CNAME entry to validate the ACM cert request
- Create an S3 bucket called nlittle.com (your TLD) again you can use www or the TLD or both, in which case you’d need two bukets. Don’t make this public.
- Create a CloudFlare distribution, and set the “Origin” to the S3 static web endpoint of the bucket. Attach the ACM TLS cert
- OIA in CloudFront is deprecated, so not recommended. Set the orgin to use OAC, and not the S3 static website endpoint. In order to use OAC (Original Access Control): Edit the bucket policy to allow access only from the ARN of the CloudFront distribution (there is a sample policy that will be shown to use), so nobody can bypass CloudFront, or hit the bucket assets directly:
{
    "Version": "2008-10-17",
    "Id": "PolicyForCloudFrontPrivateContent",
    "Statement": [
        {
            "Sid": "AllowCloudFrontServicePrincipal",
            "Effect": "Allow",
            "Principal": {
                "Service": "cloudfront.amazonaws.com"
            },
            "Action": "s3:GetObject",
            "Resource": "arn:aws:s3:::nlittle.com/*",
            "Condition": {
                "StringEquals": {
                    "AWS:SourceArn": "arn:aws:cloudfront::096137532833:distribution/yourCloudFrontDistributionHere"
                }
            }
        }
    ]
}
- Add a CNAME entry (alias) in R53 to point your custom domain to the CloudFront distribution (if you had no CloudFront,this would be the S3 bucket endpoint)
Part 3: Getting Hugo Going
- Hugo is great, Follow the quick start guide to build etc. Mostly straightforward, Keeping defaults, all you really need is to upload the content of the /public directory inside your S3 bucket.
At first I was testing manually building, uploading Hugo, and invalidating the CloudFront cache. But that got tedious quick, so I whipped up a quick BASH script to:
- Build Hugo
- Deploy the contents of the websites /public dir to my S3 bucket
- Invalidate the CloudFront cache to ensure the latest site version is displayed
#!/bin/bash
set -e
#The “set –e” allows an exception to throw where it finds the error
#and then the halt execution. Error message and line number displayed (in lieu of me using more robust error handling logic)

# Execute this script your Hugo site directory (e.g mine is /%fullcanoicalpath%/nicklittle

# Using AWS CLI V2, setup using `aws configure sso` FIRST

#Variable Declaration, add your CloudFront distribtuion ID, S3 bucket name, and AWS Profile Name
DISTRIBUTION_ID=YOURCLOUDFRONTDISTRIBUTIONID
BUCKET_NAME=nlittle.com
PROFILE=nlittlecomwebhosting

hugo -v #this builds hugo (so it's packaged ready for upload)

#Copy the contents of /profile in your Hugo Site (all that's required to your S3 bucket using variables defined above)
aws s3 sync --profile ${PROFILE} public/ s3://${BUCKET_NAME}/

# Perform an Invalidate cache on everything in your CloudFront distribution, so no old files are cached and the site is up to date
aws cloudfront create-invalidation --profile ${PROFILE} --distribution-id ${DISTRIBUTION_ID} --paths "/*"
I want to implement a better deployement pipeline some day in the future. All I do to deploy is jump into my local terminal and run: ./hugodeploy and git push which is easy enough for now. Also better logic to upload only the delta of files for S3 is something I’m consdering with GIT.
The really nice part of this is since I’m using AWS IAM Identity Center, and Google Workspaces for the IDP, configuring and using the AWS CLI V2 via terminally locally is stupid easy to setup, and account switch as it uses STS under the hood to obtain temporary short term credentials.
-
ALMOST. You’ll get a HTTP 403 error on any page that’s not the index (due to how Hugo serves the pages out of sub directories and CloudFront can’t access them). This includes /robots.txt and sitemap.xml for SEO will not work.
-
I used a lambda@edge application to route requests to get posts to display. Ensure you deploy it in the Virginia Region (for CloudFront and ACM or it’ll fail).
-
For the CloudFormation stack, go to resources, get the Lambda Role IAM role created, edit the trust relationship and allow cloudfront as a service to assume the IAM role, save (note: Trust Policy, not permissions!)
{
    "Version": "2012-10-17",
    "Statement": [
        {
            "Effect": "Allow",
            "Principal": {
                "Service": [
                    "lambda.amazonaws.com",
                    "cloudfront.amazonaws.com",
                    "edgelambda.amazonaws.com"
                ]
            },
            "Action": "sts:AssumeRole"
        }
    ]
}
-
Back to the stack go to outputs and find ‘StandardRedirectsForCloudFrontVersionOutput` and take note of the ARN
-
Go to your CloudFront Distribution > Behaviour > Edit Behaviour > Lambda Function Association > Origin Request > enter the Lambda’s ARN > Save to deploy
Nearly there! I found out that Hugo’s custom error pages are located at /layouts/404.html, and CloudFront again can’t access these as expected. So let’s offload this error handling back to CloudFront again:
- Cloudfront > Error Pages > Create Custom Error Response > HTTP Error Code: 403 Forbidden > Customize Error Response: Yes > Response Page Path:/404/html > HTTP Response Code: 404: Not found
That’s it! Still a constant work in progress (aren’t all things)! Lots of improvements on deployments to come, and more learning how to make Hugo prettier.